안녕하세요 씨앤텍시스템즈입니다.
이번 포스트에서는 쿠키를 이용한 개인화와 인증에 대해 알아보도록 하겠습니다.

쿠키를 통한 가상의 로그인 정보 저장
res.writeHead(200, {
        'Set-Cookie': [
            'yummy_cookie=choco',
            'tasty_cookie=strawberry',
            `Permanent=cookies; Max-Age=${60*60*24+30}`,
			'Secure=Secure; Secure',
            'HttpOnly=HttpOnly; HttpOnly',
            ]
})

if (pathname === "/login_process"){
      var body = '';
      request.on('data', function(data){
          body = body + data;
      });
      request.on('end', function(){
          var post = qs.parse(body);
          if(post.email === 'test@cookie.com' && post.password === '1234'){
            response.writeHead(302, {
              'Set-Cookie': [
                `email=${post.email}`,
                `password=${post.password}`,
                `nickname=test`
              ],
              Location: `/`
            });
            response.end();
          } else {
            response.end('who?');
          }

      });
    }
쿠키 옵션 중,
`Permanent=cookies; Max-Age=${60*60*24+30}` 중,
Max-Age=${60*60*24+30} 은 쿠키가 얼마 동안 살 것인가를 나타냅니다.
'Secure=Secure; Secure',
cookie는 세션 id가 있으면, http로 접근 시 본인인 척을 할 수 있습니다.
해당 코드를 통해서 https일 경우에서만 쿠키가 나타나도록 하여 더욱 안전하게 보호할 수 있습니다.
'HttpOnly=HttpOnly; HttpOnly',
일반적인 쿠키는 document.cookie를 통해 접근 가능한 것과 같이, js를 통해 접근이 가능합니다.
해당 코드는 javaScript를 통해 쿠키에 접근하지 못하도록 막아주는 역할을 합니다.
위의 코드를 실행시키면, 아래와 같이 쿠키가 저장됨을 알 수 있습니다.
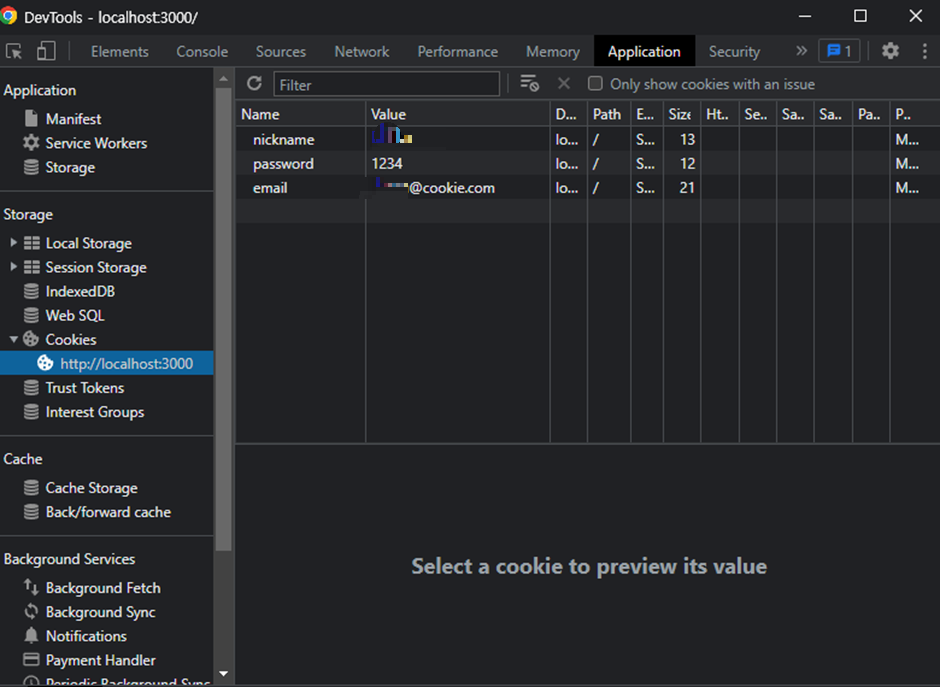
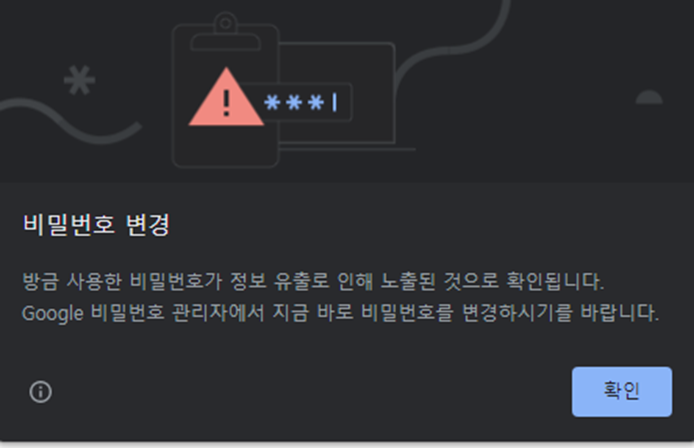
해당 프로젝트는 연구용으로, 샘플 계정을 사용하여 해당 보안 경고는 무시하고 진행합니다.
계정 로그인 값이 제대로 설정되었을 때, 로그아웃 버튼 생성
var app = http.createServer(function(request,response){
var _url = request.url;
var queryData = url.parse(_url, true).query;
var pathname = url.parse(_url, true).pathname;
var isOwner = false;
var cookies = {}
	if(request.headers.cookie) {
		cookies = cookie.parse(request.headers.cookie);

	}
	console.log(cookies)
기본적으로 false인데, 어떤 조건에서 truth가 되는지 생각해 봅시다.
여기서는 로그인 계정이 쿠키에 저장되어 있다고 판단하면 true가 됩니다.
request.headers.cookie 이 코드를 통해 쿠키에 접근할 수 있다.
하지만, 위의 코드에서는 단지 string으로 존재하기 때문에 cookie 모듈을 가져와서 parsing 을 통해 가공합니다.
위의 코드를 실행시키면 아래와 같은 결과를 확인할 수 있습니다.

 if(request.headers.cookie) {
      cookies = cookie.parse(request.headers.cookie);
    }
    if(cookies.email === 'test@cookie.com' && cookies.password === '1234') {
      isOwner = true;
    }
    console.log(isOwner)
위의 request.headers.cookie는 cookie 값이 있는 경우에만 실행됩니다. 자세히 설명하면 아래와 같습니다:

이처럼 쿠키 정보가 남아있는 상태에서, reload 하면 isOwner가 true로 실행되는데,
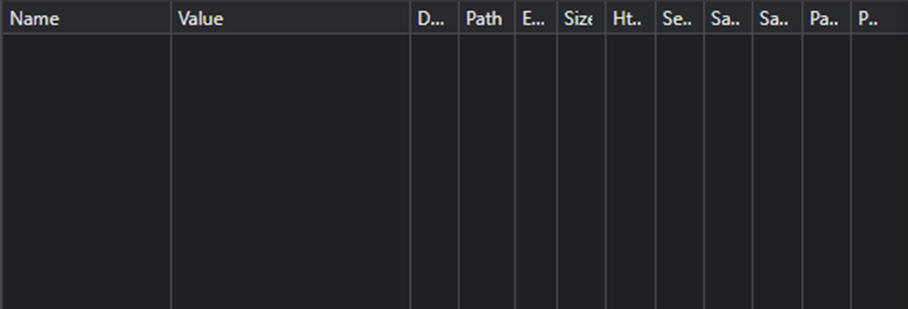
이처럼 쿠키 정보가 없는 상태에서 reload를 하면 isOwner가 false로 실행됩니다.

Codes Cleaning
authIsOwner 함수 생성
function authIsOwner (request, response) {
  var isOwner = false;
  var cookies = {}
  if(request.headers.cookie) {
    cookies = cookie.parse(request.headers.cookie);
  }
  if(cookies.email === 'test@cookie.com' && cookies.password === '1234') {
    isOwner = true;
  }
  return isOwner;
}
var app = http.createServer(function(request,response){
-생략-
    var isOwner = authIsOwner(request, response);
    console.log(isOwner);
})
로그인 상태를 UI에 반영
module.exports = {
  HTML: function (title, list, body, control, authStatusUI = '<a href="/login">login</a>') {
    return `
    <!doctype html>
    <html>
    <head>
      <title>WEB1 - ${title}</title>
      <meta charset="utf-8">
    </head>
    <body>
      ${authStatusUI}
      <h1><a href="/">WEB</a></h1>
      ${list}
      ${control}
      ${body}
    </body>
    </html>
    `;
  },
Template을 위와 같이 수정한다.
authStatusUI = `<a href="/login">login</a>' 와 같은 파라미터를 작성하면, authStatusUI라는 파라미터가 없는 경우, 기본적으로 authStatusUI의 매개변수는 해당 a 태그가 됩니다.
var app = http.createServer(function(request,response){
    var _url = request.url;
    var queryData = url.parse(_url, true).query;
    var pathname = url.parse(_url, true).pathname;
    var isOwner = authIsOwner(request, response);
    var authStatusUI = '<a href="/login">login</a>';
    console.log(isOwner);
    if(isOwner) {
      authStatusUI = '<a href="/login_process">logout</a>'
    }

    if(pathname === '/'){
      if(queryData.id === undefined){
        fs.readdir('./data', function(error, filelist){
          var title = 'Welcome';
          var description = 'Hello, Node.js';
          var list = template.list(filelist);
          var html = template.HTML(title, list,
            `<h2>${title}</h2>${description}`,
            `<a href="/create">create</a>`,
            authStatusUI
          );
          response.writeHead(200);
          response.end(html);
	});
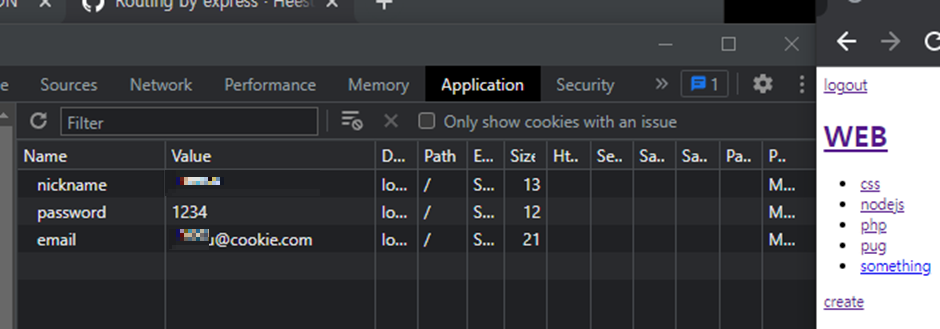
isOwner가 true인 경우,
Codes cleaning
authStatusUI 함수 생성
function authStatusUI(request, response) {
  var authStatusUI = '<a href="/login">login</a>';

  if(authIsOwner(request,response)) {
    authStatusUI = '<a href="/logout_process">logout</a>'
  }
  return authStatusUI;
if(pathname === '/'){
if(queryData.id === undefined){
fs.readdir('./data', function(error, filelist){
var title = 'Welcome';
var description = 'Hello, Node.js';
var list = template.list(filelist);
var html = template.HTML(title, list,
`<h2>${title}</h2>${description}`,
`<a href="/create">create</a>`,
authStatusUI(request, response)
);
response.writeHead(200);
response.end(html);
});모든 router에 대해서 로그인 정보가 유지되도록 authStatusUI 지정
if(pathname === '/'){
      if(queryData.id === undefined){
        fs.readdir('./data', function(error, filelist){
          var title = 'Welcome';
          var description = 'Hello, Node.js';
          var list = template.list(filelist);
          var html = template.HTML(title, list,
            `<h2>${title}</h2>${description}`,
            `<a href="/create">create</a>`,
            authStatusUI(request, response)
          );
          response.writeHead(200);
          response.end(html);
        });
} else {
fs.readdir('./data', function(error, filelist){
var filteredId = path.parse(queryData.id).base;
fs.readFile(`data/${filteredId}`, 'utf8', function(err, description){
var title = queryData.id;
var sanitizedTitle = sanitizeHtml(title);
var sanitizedDescription = sanitizeHtml(description, {
allowedTags:['h1']
});
var list = template.list(filelist);
var html = template.HTML(sanitizedTitle, list,
`<h2>${sanitizedTitle}</h2>${sanitizedDescription}`,
` <a href="/create">create</a>
<a href="/update?id=${sanitizedTitle}">update</a>
<form action="delete_process" method="post">
<input type="hidden" name="id" value="${sanitizedTitle}">
<input type="submit" value="delete">
</form>`,
authStatusUI(request, response)
);
response.writeHead(200);
response.end(html);
});
});
}
} else if(pathname === '/create'){
fs.readdir('./data', function(error, filelist){
var title = 'WEB - create';
var list = template.list(filelist);
var html = template.HTML(title, list, `
<form action="/create_process" method="post">
<p><input type="text" name="title" placeholder="title"></p>
<p>
<textarea name="description" placeholder="description"></textarea>
</p>
<p>
<input type="submit">
</p>
</form>
`,
'',
authStatusUI(request, response)
);
response.writeHead(200);
response.end(html);
});
} else if(pathname === '/create_process'){
var body = '';
request.on('data', function(data){
body = body + data;
});
request.on('end', function(){
var post = qs.parse(body);
var title = post.title;
var description = post.description;
fs.writeFile(`data/${title}`, description, 'utf8', function(err){
response.writeHead(302, {Location: `/?id=${title}`});
response.end();
})
});
} else if(pathname === '/update'){
fs.readdir('./data', function(error, filelist){
var filteredId = path.parse(queryData.id).base;
fs.readFile(`data/${filteredId}`, 'utf8', function(err, description){
var title = queryData.id;
var list = template.list(filelist);
var html = template.HTML(title, list,
`
<form action="/update_process" method="post">
<input type="hidden" name="id" value="${title}">
<p><input type="text" name="title" placeholder="title" value="${title}"></p>
<p>
<textarea name="description" placeholder="description">${description}</textarea>
</p>
<p>
<input type="submit">
</p>
</form>
`,
`<a href="/create">create</a> <a href="/update?id=${title}">update</a>`,
authStatusUI(request, response)
);
로그아웃
if (pathname === "/logout_process"){
      var body = '';
      request.on('data', function(data){
          body = body + data;
      });
      request.on('end', function(){
          var post = qs.parse(body);

            response.writeHead(302, {
              'Set-Cookie': [
                `email=; Max-Age=${0}`,
                `password=; Max-Age=${0}`,
                `nickname=; Max-Age=${0}`
              ],
              Location: `/`
            });
            response.end();


      });
    }
접근 제어
로그인되어 있는 사용자만 create, update, delete와 같은 기능을 제공하기 위한 접근 제어 기능을 추가합니다.
계정 확인이 필요한 모든 router에 아래 코드를 추가합니다.
if(pathname === '/update_process'){
      if(authIsOwner(request, response) === false) {
        response.end('Login Required!!');
        return false;
}
여기서 return 값의 false는 createServer에 callback으로 들어가 있는 해당 함수인,
var app = http.createServer(function(request, response)를 종료시켜서 다음에 따라오는 로그인 시 페이지 작성 코드가 실행되지 않도록 합니다.
Express session & authentification
express-session을 통해 더 안전한 애플리케이션을 구현해 봅니다.
기본적으로 session은 휘발성 저장소인 memory에 저장된다.
express의 session-file-store 모듈은 이러한 문제점을 해결하기 위해 휘발성을 지니지 않도록 파일에 저장할 수 있도록 한다.
var express = require('express')
var parseurl = require('parseurl')
var session = require('express-session')

var app = express()

app.use(session({
  secret: 'keyboard cat',
  resave: false,
  saveUninitialized: true,
}))

app.get('/', function (req, res, next) {
    console.log(req.session)
    if(req.session.num === undefined) {
        req.session.num = 1;
    } else {
        req.session.num = req.session.num + 1;
    }
  res.send(`Views : ${req.session.num}`);
})

app.listen(3000, function () {
    console.log('Listening port 3000')
})
위 코드를 통해서 session middleware를 설치했을 때, request 객체에 프로퍼티로 session이라고 하는 객체를 추가한다는 것을 알 수 있다.
var FileStore = require('session-file-store')(session);
var app = express()
app.use(session({
  secret: 'keyboard cat',
  resave: false,
  saveUninitialized: true,
  store: new FileStore()
}))
위처럼 session-file-store 모듈을 설치하고 나면,

위와 같은 파일이 생성되고, 페이지를 reload할 때마다 num 값이 업데이트되는 것을 확인할 수 있다.
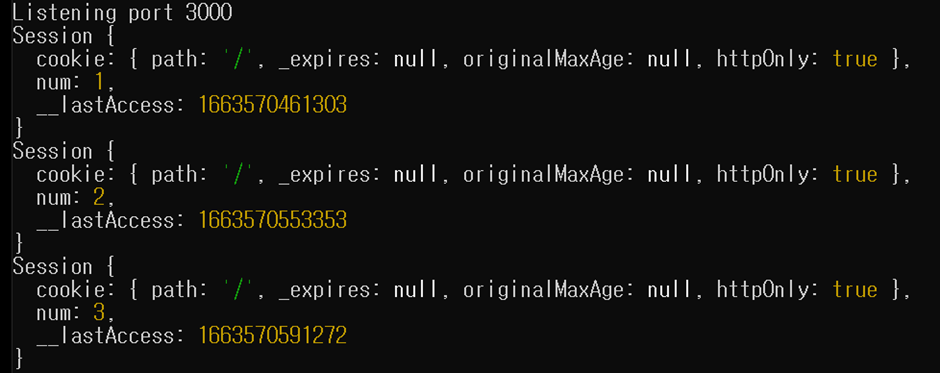
이 middleware가 실행되는 과정을 추정해 보면,
사용자가 sessionid를 갖고 있는 상태에서 서버에 접속하면,
request headers의 cookie 항목에서 확인 가능하듯, 서버 쪽으로 sessionid를 전달한다.
그러면 session middleware가 저 sessionid 값을 가지고 session store에서 id 값에 대응하는 파일을 읽는다.
해당 파일 안의 데이터를 기반으로 request 객체의 session이라고 하는 프로퍼티에 객체를 추가한다.
그 store에 있는 데이터의 num값이 예를 들어 3이니까,
app.get('/', function (req, res, next)여기서 req.session.num의 값을 3으로 셋팅해서 공급해주는 것이다.
if(req.session.num === undefined) {
        req.session.num = 1;
    } else {
        req.session.num = req.session.num + 1;
}
그 후, 조건문 코드를 거쳐 num의 값이 업데이트되면,
request가 끝난 다음에, session middleware가 해당 파일(session 디렉터리에 생성된 파일)에 그 값을 업데이트하며 작업을 마친다.
마무리하며,
지금까지 쿠키를 이용한 개인화의 핵심 기능과 인증의 기본을 알아보았습니다.
지금과 같은 방법으로 쿠키에 개인 정보를 넣으면 안 됩니다. 쿠키를 통한 사용자 인증 구현은 가능하지만 심각한 보안 상 이슈로 사용하지 않습니다.
이러한 문제점을 해결하기 위해 기초적인 방법인 session은 인증 정보를 쿠키에 저장하지 않고, 사용자의 식별자를 저장합니다. 이러한 식별자는 어떠한 의미도 갖고 있지 않습니다.
그렇다 하더라도 이번 포스트에서는 보안을 전혀 고려하지 않은 애플리케이션으로 절대 실제 사용되는 애플리케이션에서는 사용하면 안 됩니다.
(참고자료)
https://expressjs.com/en/advanced/best-practice-security.html
Security Best Practices for Express in Production
Production Best Practices: Security Overview The term “production” refers to the stage in the software lifecycle when an application or API is generally available to its end-users or consumers. In contrast, in the “development” stage, you’re stil
expressjs.com
https://www.npmjs.com/package/express-file-store
express-file-store
express middleware to access/write/remove files (using file path) with various backends. Latest version: 1.0.3, last published: 6 years ago. Start using express-file-store in your project by running `npm i express-file-store`. There are no other projects i
www.npmjs.com
https://www.npmjs.com/package/express-session
express-session
Simple session middleware for Express. Latest version: 1.17.3, last published: 4 months ago. Start using express-session in your project by running `npm i express-session`. There are 4373 other projects in the npm registry using express-session.
www.npmjs.com
'Web Programming' 카테고리의 다른 글
| Spring Boot에서 MyBatis 적용 (1) | 2023.12.15 |
|---|---|
| NodeJS 와 Angular, React 앱 연동 (0) | 2023.12.11 |
| Promise 비동기 처리의 이해 (0) | 2022.09.08 |
| Sass 와 SCSS의 차이 (0) | 2022.08.22 |
| React와 Vue (1) | 2022.05.12 |