안녕하세요, 씨앤텍시스템즈 이나연 연구원입니다.
이 글에서는 저번 글에서 만든 List 컴포넌트에 스타일을 적용시켜보려고 합니다. html 문서에 css 스타일 코드를 추가하는 것처럼 css 파일을 연결할 수도 있지만 js 파일 안에서 컴포넌트에 바로 스타일을 적용시키거나, 스타일이 적용되어 있는 라이브러리에서 컴포넌트를 가져와 사용할 수도 있습니다.
아래 글에서 여러 방법들에 대해 하나씩 살펴보겠습니다.
이어지는 글
React 2. Emotion을 이용한 React component 스타일링 (with. CSS-in-JS)
React 3. Redux, Redux Toolkit - Global UI Component 만들기
목차
- CSS-in-JS
- Emotion
- 마무리
1. CSS-in-JS
CSS-in-JS는 말 그대로 css를 js 문서 안에서 사용하는 방법을 말합니다.
CSS-in-JS는 css 관리의 기존의 css 적용 방식에서 발생하는 이슈들을 해결하기 위한 방안으로 처음 제안되었습니다. React라는 툴을 사용하면서 html과 js 코드를 한 문서에서 관리할 수 있게 되었지만, css는 여전히 다른 문서에서 관리하면서 사용되지 않는 css 코드가 발생하는 등의 css 관리의 어려움이 있었습니다. CSS 전처리기나 BEM과 같은 방법론을 사용하면서도 완전히 해결되지 않는 문제들이 존재했고, 이를 해결하기 위한 방법으로 아래 이미지처럼 규모가 커진 프로젝트의 css에서 발생하는 7가지 문제점들을 해결할 수 있다고 말하며 소개되었습니다.

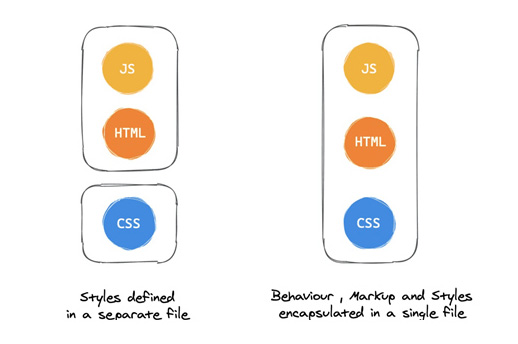
예를 들어, 일반적인 CSS-in-CSS 방식은 전처리기나 BEM 방법을 적용할 때에도 스타일 파일을 따로 관리하거나 분리된 영역에서 관리하기 때문에 스타일을 새로 적용하거나 변경할 때 어떤 요소에 영향이 갈지 한눈에 알아보기가 힘들어집니다. 반면에 CSS-in-JS를 사용하면 아래 그림과 같이 js, html, css를 하나의 문서에서 관리할 수 있고, 세 가지 코드가 같은 상태를 공유하면서 문서 하나가 그대로 하나의 독립적인 컴포넌트가 되기도 합니다.
css가 js와 상태를 공유하게 되면 js에서 style을 컨트롤하지 않고 온전히 상태에 따라서만 스타일이 적용됩니다. document.getElementById('app').style.color = 'red'같은 코드를 하나씩 하나씩 더 이상 작성하지 않아도 된다는 말이 됩니다. document.getElementById('app').classList.add('bold')와 같이 클래스를 하나하나 지정하지도 않고 컴포넌트가 상태를 공유 받아 상태에 따라 스타일을 지정합니다. 이렇게 CSS-in-JS에 따라 생성된 스타일링 컴포넌트는 css module화 되어 지정된 컴포넌트에만 스타일을 적용시키도록 합니다.
// Cat.js
import styled from 'styled-components';

const Cat = styled.div`
  color: orange
`
...

<Cat>A Cat</Cat>
<style>
.cat_meow_j3xk {
color: orange;
}
</style>
<div class="cat_j3xk">A Cat</div>물론, React 프로젝트에 html 문서 head에 <link /> 태그를 사용하여 css 파일을 적용시킬 수도, import를 사용하여(ES6+) css 파일을 직접 연결할 수도 있습니다. 혹은 각 컴포넌트 별로 css module(*.module.css) 파일을 각각 연결하여 다른 컴포넌트와 충돌하는 경우를 방지할 수도 있습니다.
2. Emotion
2-1. Emotion에 대한 짧은 소개
이번에는 Emotion을 사용하여 CSS-in-JS을 컴포넌트에 적용시켜보려고 합니다. 그전에 Emotion에 대해 짧게 설명을 하고 넘어가겠습니다. 이미 Emotion을 알고 계시다면 다음으로 넘어가셔도 괜찮습니다.
Emotion은 현재 CSS-in-JS 라이브러리 중 styled-components와 함께 가장 대표적이라고 할 수 있습니다. 아래 그래프는 여러 CSS-in-JS 라이브러리 npm 패키지의 다운로드 수를 보여주고 있고, 그중 가장 눈에 띄는 라이브러리를 꼽자면 Emotion, styled-components, jss가 될 것입니다. @emotion/core 패키지는 11버전 이후로 @emotion/react로 패키지 이름이 변경되어 두 번째 그래프와 함께 참고하시기 바랍니다.


emotion의 styled는 위에서 스타일 코드를 작성하는 방법이 비슷하지만 scss 기본 문법을 적용하여 html 태그나 React 컴포넌트를 불러와 사용합니다. 템플릿 리터럴을 통해 일반 scss 코드처럼 작성하거나 해당 컴포넌트의 props를 인자로 받는 함수를 사용하여 카멜 케이스로 css 프로퍼티를 작성하여 컴포넌트의 props에 따른 스타일을 적용시킵니다.


이번 글에서 이 두 가지를 사용하여 컴포넌트를 스타일링할 것입니다.
2-2. 리스트 기능 보완하기
그리고 리스트를 스타일링하기 전에, 리스트와 상호작용할 수 있는 기능들을 보완하겠습니다.
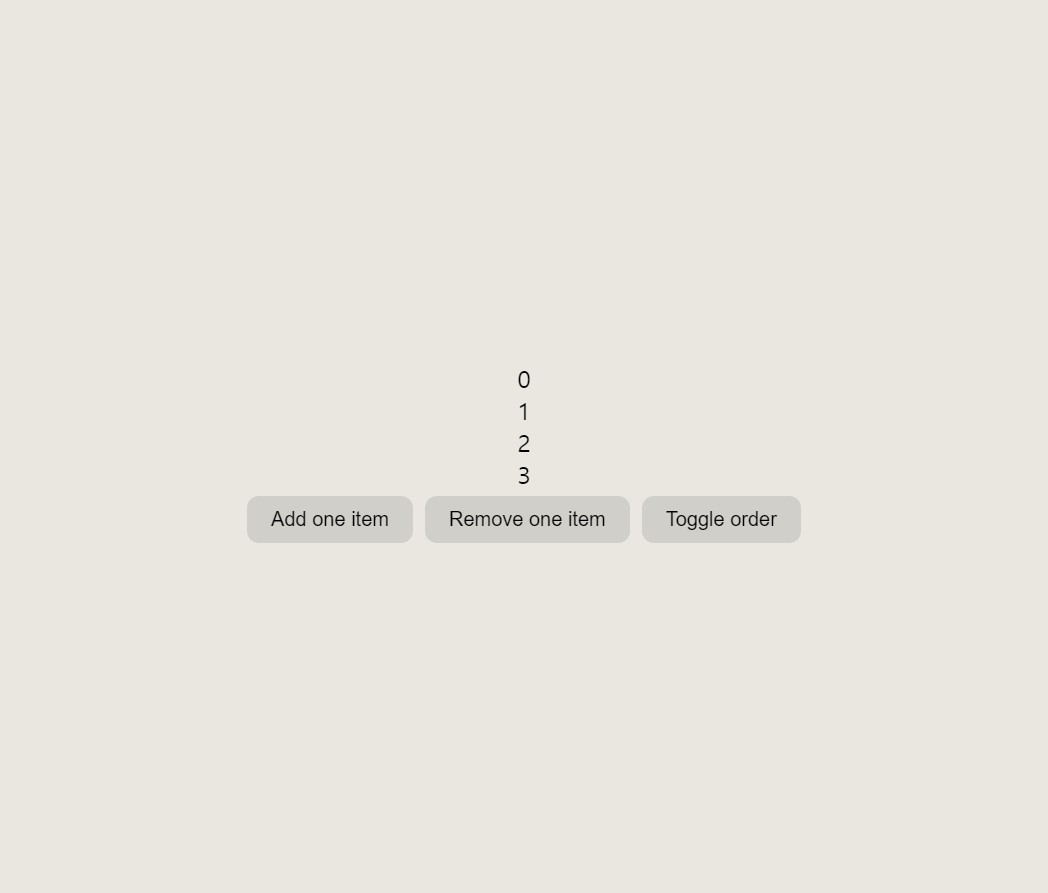
리스트 아이템을 추가하고 정렬할 수 있도록 수정하려고 합니다. CSS-in-JS를 사용해 보는 것이 이번 글의 목적이므로 코드에 대한 자세한 설명은 넘어가겠습니다. 두 개의 버튼이 리스트 아이템을 하나씩 추가하거나 제거하도록 수정했고, 정렬방법을 변경할 수 있는 버튼을 추가했습니다.

function ListWrapper() {
	...

  const handleRemoveOneItem = () => {
    const maxIdNum = items.reduce((max, cur) => Math.max(max, cur.id), -Infinity);
    setState({
      ...state,
      items: items.filter((item) => item.id !== maxIdNum)
    });
  };
  const handleToggleOrder = () => {
    if (orderedAsc) {
      setState({
        items: [...items].sort((a, b) => b.id - a.id),
        orderedAsc: !orderedAsc
      });
    } else {
      setState({
        items: [...items].sort((a, b) => a.id - b.id),
        orderedAsc: !orderedAsc
      });
    }
  };

  return (
    <>
      <List items={items} />
      <button onClick={handleAddOneItem}>Add one item</button>{" "}
      <button onClick={handleRemoveOneItem}>Remove one item</button>{" "}
      <button onClick={handleToggleOrder}>Toggle order</button>
    </>
  );
}
2-3. @emotion/css
드디어 emotion을 사용하여 화면에 보이는 리스트를 스타일링해 보겠습니다.
먼저 아래와 같이 리스트의 기본 스타일과 HTML 태그들의 기본적인 margin과 padding 값을 0으로 리셋한 후,
import { injectGlobal } from "@emotion/css";
...
injectGlobal`
	body {
    background: rgba(212,207,193,0.4);
  }
  *:not(button) {
    margin: 0;
    padding: 0;
  }
  li {
    list-style: none;
  }
`;
<ListWrapper /> 컴포넌트를 감싸는 div 태그를 추가하여 높이를 view height와 같게 만듭니다.
import { css } from "@emotion/css";
...function App() {
  return (
    <div
      className={css`
        height: 100vh;
      `}
    >
      <ListWrapper />
    </div>
  );
}
React에서는 @emotion/react의 Global 컴포넌트와 css를 아래처럼 사용하여 동일하게 기본 css를 reset할 수도 있습니다.
import { Global, css } from "@emotion/react";
...
root.render(
  <React.StrictMode>
    <Global
      styles={css`
        *:not(button) {
          margin: 0;
          padding: 0;
        }
        li {
          list-style: none;
        }
      `}
    />
    <App />
  </React.StrictMode>
);
ListWrapper 컴포넌트도 마찬가지로 아래와 같이 css를 추가하여 컴포넌트를 화면 중앙에 오도록 만들고 버튼들을 그룹 지었습니다.
import { css } from "@emotion/css";
...
function ListWrapper() {
  ...

  return (
    <div
      className={css`
        display: flex;
        align-items: center;
        justify-content: center;
        flex-direction: column;
        height: 100%;
      `}
    >
      <List items={items} />
      <div
        className={css`
          display: flex;
          align-items: center;
          justify-content: center;
          flex-direction: column;
          flex-direction: row;
          & > button {
            margin: 4px;
          }
        `}
      >
        <button onClick={handleAddOneItem}>Add one item</button>
        <button onClick={handleRemoveOneItem}>Remove one item</button>
        <button onClick={handleToggleOrder}>Toggle order</button>
      </div>
    </div>
  );
}
사실 이러한 코드는 css가 늘어날수록 지저분해 보이고 해석에 시간에 걸리게 되는데, 이러한 점을 위해 다음 단계에서는 @emotion/styled에서 styled를 사용하여 스타일링 된 컴포넌트만 분리하여 작성하겠습니다.
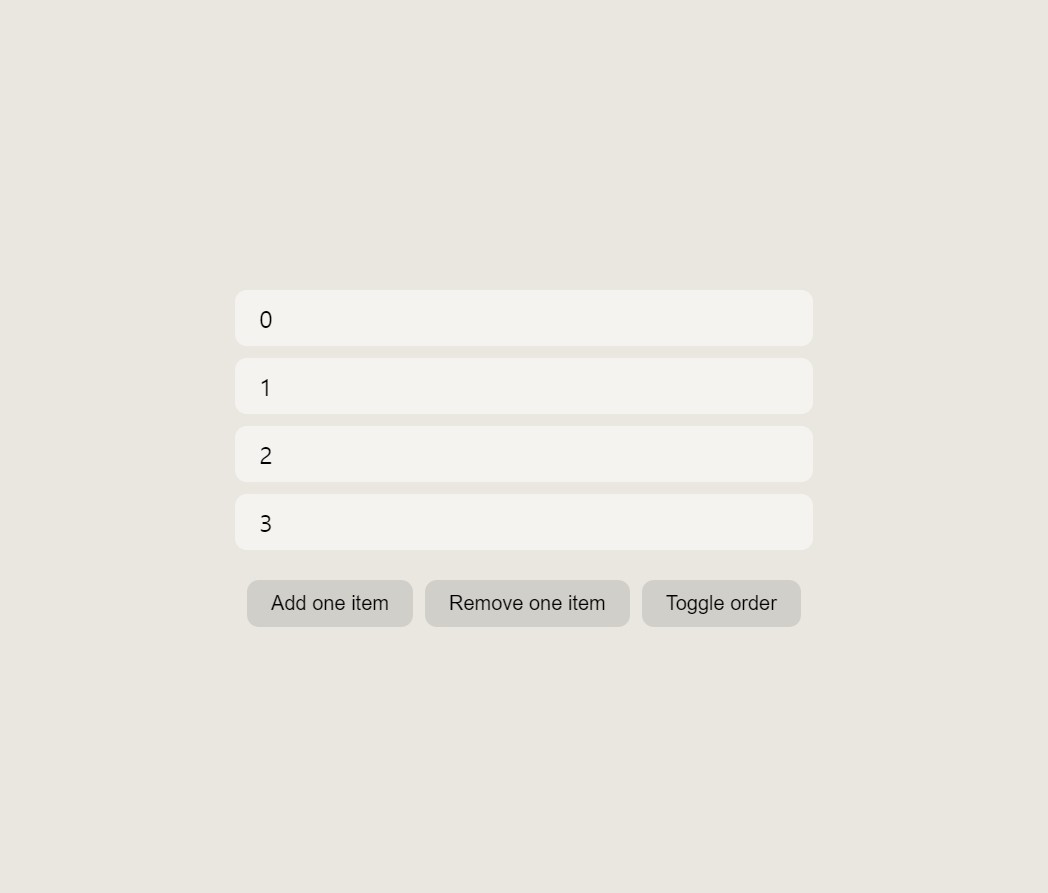
2-4. @emotion/styled
이제 styled를 사용하여 styled component를 만들어 리스트를 화면 중앙에 위치하도록 하고 리스트와 액션 버튼들을 그룹을 지어 주려고 합니다. 아래 코드처럼 공통된 부분을 CenteredWrapperStyle로 묶고 이 스타일을 상속받아 각각 OuterWrapper와 ActionWrapper로 분리하였습니다.
import styled from "@emotion/styled";
...
const CenteredWrapperStyle = styled("div")`
  display: flex;
  align-items: center;
  justify-content: center;
  flex-direction: column;
`;

const OuterWrapper = styled(CenteredWrapperStyle)`
  height: 100%;
`;

const ActionWrapper = styled(CenteredWrapperStyle)`
  flex-direction: row;
  & > button {
    margin: 4px;
    padding: 8px 16px;
    border: none;
    border-radius: 8px;
    background: rgba(0, 0, 0, 0.1);
    &:hover {
      background: rgba(0, 0, 0, 0.2);
    }
  }
`;
이렇게 만든 OuterWrapper와 ActionWrapper를 이용하여 리스트와 버튼들의 영역을 분리해 줍니다.
function ListWrapper() {
  ...

  return (
    <OuterWrapper>
      <List items={items} />
      <ActionWrapper>
        <button onClick={handleAddOneItem}>Add one item</button>
        <button onClick={handleRemoveOneItem}>Remove one item</button>
        <button onClick={handleToggleOrder}>Toggle order</button>
      </ActionWrapper>
    </OuterWrapper>
  );
}
코드처럼 function ListWrapper()에서는 css 코드가 섞이지 않은 React Element를 반환하고 있습니다.
ListItem과 List 컴포넌트에도 마찬가지로 styled를 이용하여 스타일을 추가하고 완성합니다. @emotion/css에서 keyframes을 가져와 리스트가 추가될 때 아래에서 올라오는 트랜지션을 보여주도록 애니메이션을 추가해 주었습니다.
import styled from "@emotion/styled";
import { keyframes } from "@emotion/css";

const revealAnimation = keyframes`
  from {
    transform: translateY(100%);
    opacity: 0;
  }
  to {
    transform: translateY(0);
    opacity: 1;
  }
`;

const ListBlock = styled.ul`
  display: block;
  width: 55%;
  margin-bottom: 8px;
`;

const ListItem = styled.li`
  margin: 8px 0;
  padding: 8px 16px;
  background: rgba(255, 255, 255, 0.5);
  border-radius: 8px;
	animation: ${revealAnimation} 200ms ease-out;
`;

function List({ items }) {
  return (
    <ListBlock>
      {items.map((item) => (
        <ListItem key={item.id}>{item.text}</ListItem>
      ))}
    </ListBlock>
  );
}
*(참고)전체 코드 https://codesandbox.io/s/component-styling-tdxz7y
3. 마무리
처음 CSS-in-JS 방식을 알게 되었을 때, 너무 필요한 방식이라는 생각에 빨리 사용해 보고 싶었던 기억이 있습니다. 그전까지 전처리기나 BEM 방법에 대해 알고만 있던 상태로 적극적으로 사용해 볼 생각을 안 하고 있었고, 순수 html, css, js만을 사용하여 동적인 화면을 만들다 보면 어느 순간 한 화면에 대한 코드가 여기저기 흩어져있고 특히 클래스와 변수 관리 등이 힘들어 이 수고로움을 줄일 방법을 알고 싶었습니다. 이와 비슷한 문제를 겪고 있다면 CSS-in-JS는 답이 될 수도 있을 것 같습니다.
(참고 자료)
- React: CSS in JS by Vjeux : https://speakerdeck.com/vjeux/react-css-in-js
- css의 진화 과정 : https://blog.toycrane.xyz/css의-진화-과정-f7c9b4310ff7
- CSS-in-JS는 왜 만들어졌나? : https://blog.eunsukim.me/posts/introducing-css-in-js
- 웹 컴포넌트 스타일링 관리 : CSS-in-JS vs CSS-in-CSS : https://www.samsungsds.com/kr/insights/web_component.html
- All You Need To Know About CSS-in-JS : https://hackernoon.com/all-you-need-to-know-about-css-in-js-984a72d48ebc, (번역) https://d0gf00t.tistory.com/22
- emotion : https://emotion.sh/docs/introduction
'Web Programming > React' 카테고리의 다른 글
| RTK Query를 이용하여 데이터 최신으로 관리하기(& Redux Toolkit) (0) | 2023.05.02 |
|---|---|
| React의 시작 (0) | 2022.09.30 |
| React 3. Redux, Redux Toolkit - Global UI Component 만들기 (0) | 2022.07.21 |
| React 1. Component 렌더링 (0) | 2022.07.04 |
| React 란? (0) | 2021.12.28 |