
안녕하세요, 씨앤텍시스템즈 이나연 연구원입니다.
이번 글에서는 지난 글에 이어서 웹 컴포넌트를 만들고 사용하는 가장 기본적인 방법에 대해 정리해보겠습니다.
(이전 글)
2022.01.14 - [Web Programming/Design] - UI Component
UI Component
안녕하세요, 씨앤텍시스템즈 이나연 연구원입니다. 이번 글에서는 웹/앱의 UI 개발에서 Component에 대한 내용을 정리해 보겠습니다. UI에서의 컴포넌트 UI 컴포넌트를 개발하는 다양한 방법들 1. UI
cntechsystems.tistory.com
*이 글의 내용은 아래의 문서를 참고하여 작성되었습니다.
- https://ko.javascript.info/web-components
- https://github.com/mdn/web-components-examples/tree/master/life-cycle-callbacks
내용
- 컴포넌트가 필요한 상황들
- window.customElement
1. 컴포넌트가 필요한 상황들
만약 웹 서비스 개발 중, 1초마다 현재 시간을 보여주는 시계를 html과 js를 이용하여 만든다면, 아래와 같이 만들 수 있을 겁니다.
<!doctype html>
<body>
  <p id="time"></p>

  <script>
	  const elem = document.getElementById("time");
	  const setDatetime = () => {
			const newDate = new Date();
			const hour = newDate.getHours();
			const minute = newDate.getMinutes();
			const second = newDate.getSeconds();

			elem.innerText = `${hour >= 12 ? '오후 '+hour : '오전 '+hour}:${minute}:${second}`;
	  };

	  window.onload = setDatetime;

	  setInterval(setDatetime, 1000);
  </script>
</body>
위 코드에서 만약 시간을 보여주는 방식이 다른 시계를 추가해야 하거나, 혹은 사용자가 원하는 대로 표시 방식이 변경되어야 한다면, elem.innerText에 들어갈 텍스트 형식을 하나하나 수정하고 다른 변수가 필요햘지도 모릅니다.
<!doctype html>
<body>
<script>
class TimeFormatted extends HTMLElement {

  render() {
    let date = new Date(this.getAttribute('datetime') || Date.now());

    this.innerHTML = new Intl.DateTimeFormat("default", {
      year: this.getAttribute('year') || undefined,
      month: this.getAttribute('month') || undefined,
      day: this.getAttribute('day') || undefined,
      hour: this.getAttribute('hour') || undefined,
      minute: this.getAttribute('minute') || undefined,
      second: this.getAttribute('second') || undefined,
      timeZoneName: this.getAttribute('time-zone-name') || undefined,
    }).format(date);
  }

  connectedCallback() {
    if (!this.rendered) {
      this.render();
      this.rendered = true;
    }
  }

  static get observedAttributes() {
    return ['datetime', 'year', 'month', 'day', 'hour', 'minute', 'second', 'time-zone-name'];
  }

  attributeChangedCallback(name, oldValue, newValue) {
    this.render();
  }

}

customElements.define("time-formatted", TimeFormatted);
</script>

<time-formatted id="elem" hour="numeric" minute="numeric" second="numeric"></time-formatted>

<script>
  setInterval(() => elem.setAttribute('datetime', new Date()), 1000);
</script>
</body>

...
<time-formatted id="elem2" datetime="2019-12-01"
  year="numeric" month="long" day="numeric"
  hour="numeric" minute="numeric" second="numeric"
></time-formatted>

<script>
  ...
  setInterval(() => elem2.setAttribute('datetime', new Date()), 1000);
</script>
time-formatted {
  color: blue;
  font-weight: 700;
}

2. window.customElements
앞서 사용한 `customElements.define`의 경우 아래와 같이 파라미터를 가집니다.
customElements.define(name, constructor, options);
- name : 이름은 새로 생성하는 custom element의 이름을 지정하고, 이 때 하이픈(-)을 반드시 포함해야 합니다.
- constructor : 새로 생성하는 custom element의 생성자입니다.
- options : custom element의 정의 방법을 제어하며, 필수 파라미터는 아닙니다. { extends: "ul" }와 같은 형태의 오브젝트를 사용하고, 예를 들어 { extends: "ul" }의 경우 기본 제공 엘리먼트 중 ul 요소를 확장하는 것을 의미합니다.
customElement를 사용할 때, 필수적인 생성자 이외에 아래와 같이 클래스 정의 내부에 해당 요소의 생명 주기별 몇가지 콜백을 추가로 정의할 수 있습니다.
class MyElement extends HTMLElement {
  constructor() {
    super();
    // 요소 생성
  }

  connectedCallback() {
    // 이 사용자 정의 요소가 문서에 추가될 때, 브라우저가 이 콜백을 호출합니다.
    // (요소를 반복적으로 추가/삭제할 경우 여러 번 호출할 수 있습니다.)
  }

  disconnectedCallback() {
    // 이 사용자 정의 요소가 문서에서 삭제될 때, 브라우저가 이 콜백을 호출합니다.
    // (요소를 반복적으로 추가/삭제할 경우 여러 번 호출할 수 있습니다.)
  }

  static get observedAttributes() {
    return [/* 관찰하고자 하는 attribute의 이름을 요소로 하는 배열이 return 되어야 합니다. */];
  }

  attributeChangedCallback(name, oldValue, newValue) {
    // 위에서 return된 이 사용자 정의 요소의 attribute 중 하나가 변경될 때마다 호출됩니다.
  }

  adoptedCallback() {
    // 사용자 정의 요소가 새로운 document로 이동되었을 때마다 호출됩니다.
    // (document.adoptNode에서 발생, 거의 사용되지 않음)
  }

  // 다른 요소 메서드와 속성이 있을 수 있습니다.
}
이렇게 window.customElements를 이용하여 생성한 custom element가 브라우저에게 어떻게 보일 것인지, 페이지에 추가되거나 삭제될 때 무엇을 할 것인지 등에 대해서 알려주는 역할을 하는 셈입니다.
아래 예시 코드를 통해 이를 확인해 볼 수 있습니다.


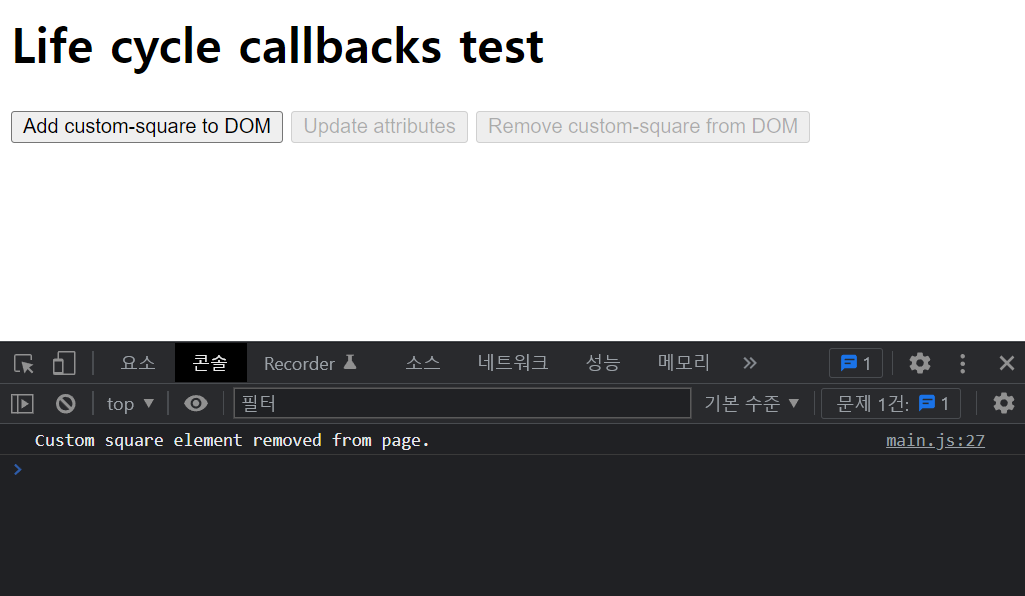
위 코드를 작성하여 브라우저로 문서를 열면 아래와 같은 화면이 나옵니다.

'Add custom-square to DOM' 버튼을 클릭하면, 아래와 같이 빨간색 상자가 생성되면서 attributeChangedCallback와 connectedCallback이 호출된 것을 알 수 있습니다.

'Update attributes' 버튼을 클릭하면, 마찬가지로 attributeChangedCallback이 호출되고,

'Remove custom-square from DOM' 버튼을 클릭하면, html에서 custom-square 요소가 사라지면서 아래와 같이 disconnectedCallback이 호출된 것을 확인 할 수 있습니다.
사용자 정의 요소 사용하기 - 웹 컴포넌트 | MDN
웹 컴포넌트 표준의 주요 기능 중 하나는 사용자 정의 페이지 기능을 제공하는 길고 중첩된 요소들의 묶음으로 만족하는 것보다는, HTML 페이지에서 기능을 캡슐화하는 사용자 정의 요소를 생성
developer.mozilla.org
(참고 자료)
- JAVASCRIPT.INFO - 웹 컴포넌트 :
https://ko.javascript.info/web-components
- MDN Web Docs - Window.suctomElement :
Window.customElements - Web API | MDN
Window 인터페이스의 customElements 읽기 전용 속성은 새로운 사용자 지정 요소를 등록하거나, 이전에 등록한 요소의 정보를 받아올 수 있는 CustomElementRegistry 객체의 참조를 반환합니다.
developer.mozilla.org
사용자 정의 요소 사용하기 - 웹 컴포넌트 | MDN
웹 컴포넌트 표준의 주요 기능 중 하나는 사용자 정의 페이지 기능을 제공하는 길고 중첩된 요소들의 묶음으로 만족하는 것보다는, HTML 페이지에서 기능을 캡슐화하는 사용자 정의 요소를 생성
developer.mozilla.org
'Web Programming' 카테고리의 다른 글
| Sass 와 SCSS의 차이 (0) | 2022.08.22 |
|---|---|
| React와 Vue (1) | 2022.05.12 |
| Front-end 노드와 링크로 구성된 네트워크 시각화 Vis.js 플러그인 (0) | 2020.12.28 |
| Adobe Illustration Working Level 2 (0) | 2020.08.21 |
| Tensorflow란? (0) | 2020.07.23 |