[ 관련 포스팅 ]
2019/06/03 - [앱 개발/무더위 쉼터] - 공공데이터 + Google Map API Android 어플리케이션(1)
2019/06/04 - [앱 개발/무더위 쉼터] - 공공데이터 + Google Map API Android 어플리케이션(3)
전 포스팅에서는 공공데이터에서 데이터를 받고 GoogleAPI를 발급받는 방법을 알아보았고 이번에는 발급받은 데이터와 키를 내 프로젝트에 등록해보겠습니다.
1. Google API Key 등록
생성한 프로젝트를 보면 상단에 AndroidMainFest파일이 있습니다.

<uses-permission android:name="android.permission.ACCESS_FINE_LOCATION" />
<uses-permission android:name="android.permission.ACCESS_COARSE_LOCATION" />
<application
  <meta-data
      android:name="com.google.android.geo.API_KEY"
      android:value="your_google_maps_key" />
  <uses-library
      android:name="org.apache.http.legacy"
      android:required="false" />
</application>
위의 코드를 AndroidMainFest에 넣어줍니다.
your_google_maps_key부분에 발급받은 Google key를 넣으시면 됩니다.
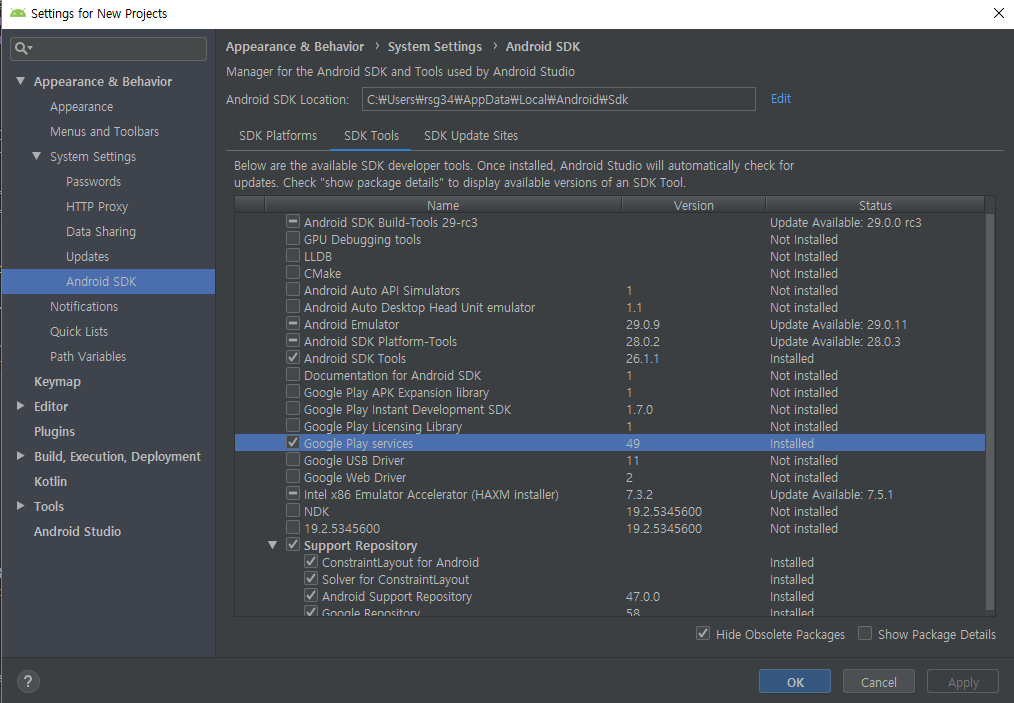
2. Google Play services 라이브러리 설치
Google Maps Android API를 사용하려면 Google Play services 라이브러리 패키지를 설치해야합니다.
Tools - SDK Mangner - Android SDK - SDK Tools - Google Play services항목울 체크해 주세요.

3. build.gradle(Module : app)

build.gradle(Module : app)에 Google Play Services 라이브러리를 프로젝트에서 사용할 수 있게 등록 해야 합니다.
아래 코드를 추가해 주세요.
android {
	compileOptions {
        sourceCompatibility JavaVersion.VERSION_1_8
        targetCompatibility JavaVersion.VERSION_1_8
    }
}
dependencies{
    implementation 'com.android.support:support-media-compat:28.0.0'
    implementation 'com.android.support:support-v4:28.0.0'
    implementation 'com.google.android.gms:play-services-maps:16.1.0'
    implementation 'com.google.android.gms:play-services-location:16.0.0'
    implementation 'com.roughike:bottom-bar:2.3.1'
    implementation 'com.android.support:design:28.0.0'
    implementation 'android.arch.lifecycle:extensions:1.1.1'
    implementation 'jexcelapi:jxl:2.6'
    implementation 'net.sourceforge.jexcelapi:jxl:2.6.12'
    implementation 'com.google.maps.android:android-maps-utils:0.4'
    implementation 'com.android.support:recyclerview-v7:28.0.0'
}
4. 레이아웃 작성
지도를 띄우기 위한 레이아웃을 작성합니다.
위쪽에 지역을 선택 할 수 있도록 Spinner와 ImageButton을 넣었습니다.


<?xml version="1.0" encoding="utf-8"?>
<LinearLayout xmlns:android="http://schemas.android.com/apk/res/android"
    xmlns:tools="http://schemas.android.com/tools"
    android:layout_width="match_parent"
    android:layout_height="match_parent"
    tools:context=".MainActivity" >

    <fragment
        android:id="@+id/g_map"
        android:layout_width="match_parent"
        android:layout_height="match_parent"
        class="com.google.android.gms.maps.MapFragment" />

</LinearLayout>
5. Map을 보여주는 Activity 작성
레이아웃에서 선언한 fragment를 선언해 g_map을 가져옵니다.
위도와 졍도를 정해주고 마커를 선언 후 마커의 옵션을 작성해합니다.

@Override
protected void onCreate(Bundle savedInstanceState) {
  super.onCreate(savedInstanceState);
  setContentView(R.layout.activity_main);

  FragmentManager fragmentManager = getFragmentManager();
  MapFragment mapFragment = (MapFragment)fragmentManager.findFragmentById(R.id.g_map);
  mapFragment.getMapAsync(this);
}
@Override
public void onMapReady(final GoogleMap map) {
LatLng latlng = new LatLng(37.56, 126.97);
MarkerOptions markerOptions = new MarkerOptions();
markerOptions.position(latlng);
markerOptions.title("서울");
markerOptions.snippet("서울특별시 중구 의주로2가 16-8");
map.addMarker(markerOptions);
map.moveCamera(CameraUpdateFactory.newLatLng(latlng));
map.animateCamera(CameraUpdateFactory.zoomTo(10));
}
6. 지역 선택 Spinner 작성
지역을 선택하기 위해 레이아웃 상단에 만들어둔 Spinner에 넣을 값을 아이템으로 작성해 주어야 합니다.
strings 안에 item을 선언해 주세요.
<string-array name="spinner01">
  <item>강원도</item>
  <item>경기도</item>
  :
</string-array>
<string-array name="spinner02">
  <item>강릉시</item>
  <item>고성군</item>
  :
</string-array>
:
도시를 선택하면 해당 지역을 나타날 수 있게 하기 위해서 spinner를 여러개로 나누어 작성하였습니다.
spinner01은 도시(특별시)가 될것 이고, spinner02~는 각 시의 지역이 됩니다.
string-array로 값을 주었기 때문에 받아올때는 ArrayAdapter<CharSequence>로 받아와야 합니다.
ArrayAdapter<CharSequence> spinner01, spinner02, ... ;spinner01 = ArrayAdapter
.createFromResource(this, R.array.spinner01, android.R.layout.simple_spinner_dropdown_item);Spinner spin01 = (Spinner) findViewById(R.id.spinner1);
Spinner spin02 = (Spinner) findViewById(R.id.spinner2);spin01.setOnItemSelectedListener(new AdapterView.OnItemSelectedListener() {
//spinner1를 누르면 나타나는 코드 작성
spin02.setOnItemSelectedListener(new AdapterView.OnItemSelectedListener() {
//spinner2에 표시할 내용 작성
}
}7. assets에 데이터 넣기

Now - Folder - Assets Floder를 선택하면 폴더가 생성되는데 생성된 폴더에 전처리 해서 나눠둔 파일을 넣어주세요.
데이터가 .xls 형식으로 되어 있음으로 위의 build.gradle에 추가 해 주었던 jxl를 사용해 데이터를 받아오겠습니다.
InputStream is = getBaseContext().getResources().getAssets().open(filename);
Workbook wb = Workbook.getWorkbook(is);
InputStream를 선언해 filename에 들어갈 이름과 같은 assets폴더안의 파일을 가져옵니다.
MarkerOptions markerOptions = new MarkerOptions();
markerOptions.position(testmarker);//위도경도
markerOptions.title(markerTitle);//마커를 눌렀을때 나타나는 말풍선 제목
markerOptions.snippet(markerSnippet);//말풍선 제목 밑의 작은 글씨
markerOptions.draggable(true);
마커를 선언하고 가져온 데이터를 마커 옵션에 넣어줍니다.
8. GoogleMap.setOnInfoWindowClickListener
마커를 선택하면 말풍선이 나오고 그 말풍선을 클릭했을 때 새로운 화면으로 넘어 가기 위해서 OnInfoWindowClickListener를 사용합니다.

GoogleMap.setOnInfoWindowClickListener(new GoogleMap.OnInfoWindowClickListener() {

  @Override
  public void onInfoWindowClick(Marker marker) {
    Intent intent = new Intent(getBaseContext(), NewActivity.class);

    //넘겨줄 값

    startActivity(intent);
  }
});
Intent를 선언해 값을 저장하고 새로운 Activity에 데이터를 넘깁니다.
9. NewActivity
화면 위에는 선택한 마커의 지도상의 위치를 보여주고 하단에 쉼터의 상세한 정보를 보여주려고 합니다.
LinearLayout으로 화면을 나눠 작성했습니다.

<LinearLayout
  android:layout_width="match_parent"
  android:layout_height="345dp">
  <fragment
    android:id="@+id/mapView"
    class="com.google.android.gms.maps.MapFragment"
    android:layout_width="match_parent"
    android:layout_height="match_parent" />
</LinearLayout>
<LinearLayout
  android:layout_width="match_parent"
  android:layout_height="match_parent"
  android:orientation="vertical"
  android:layout_marginLeft="10pt">
  <TextView
    android:id="@+id/textView1"
    android:layout_width="wrap_content"
    android:layout_height="wrap_content"
    android:layout_alignParentLeft="true"
    android:layout_below="@+id/imageView1"
    android:text="Naem"
    android:textAppearance="?android:attr/textAppearanceLarge" />
    :
</LinearLayout>
지도를 띄우기 위해 MapFragment를 선언해 줍니다.
FragmentManager fragmentManager = getFragmentManager();
MapFragment mapFragment = (MapFragment)fragmentManager.findFragmentById(R.id.mapView);
mapFragment.getMapAsync(this);
Bundle을 통해 MainActivity에서 넘져준 값을 받아옵니다.
Bundle extras = getIntent().getExtras();

title = extras.getString("title");
address = extras.getString("address");
excelname = extras.getString("excelname");
:
MainActivity에서 넘겨준 값과 엑셀에서 받아온 값이 같다면 같은 값을 리턴받아 TextView에 넣어줍니다.
if (excelname == null && inter2 == 0) {
	//
  }else{
  	Excel(excelname, inter2);
  }
  if (choice_do == null && inter == 0) {
  	//
  }else{
  	Excel(choice_do, inter);
}
private void Excel(String excelname, int inter2) {
//엑셀 데이터 가져오는 코드
}TextView tvTitle = tvTitle.setText("쉼터명 : " + title);
10. 결과물

[ 관련 포스팅 ]
2019/06/03 - [앱 개발/무더위 쉼터] - 공공데이터 + Google Map API Android 어플리케이션(1)
2019/06/04 - [앱 개발/무더위 쉼터] - 공공데이터 + Google Map API Android 어플리케이션(3)
'ETC > 무더위 쉼터' 카테고리의 다른 글
| 공공데이터 API 사용 개발 (0) | 2019.06.05 |
|---|---|
| 공공데이터 + Google Map API Android 어플리케이션(3) (0) | 2019.06.04 |
| 공공데이터 + Google Map API Android 어플리케이션(1) (0) | 2019.06.03 |
