안녕하세요, 씨앤텍시스템즈 이형빈 연구원입니다.
이번 포스트는 Redhat 8.9 환경에 Oracle21c 버전을 설치하는 방법을 소개해 드리겠습니다.

- 사용 환경
- Remote Desktop Client : MobaXterm
- Virtual Machine Software : VMware Workstation
- OS : Red Hat Enterprise Linux 8.9
- Hard Dist : 40GB
- Memory : 4GB
1. Oracle21c 다운로드
https://www.oracle.com/database/technologies/oracle21c-linux-downloads.html
Oracle Database 21c Download for Linux x86-64
Oracle Database 21c Grid Infrastructure (21.3) for Linux x86-64 Contains the Grid Infrastructure Software including Oracle Clusterware, Automated Storage Management (ASM), and ASM Cluster File System. Download and install prior to installing Oracle Real Ap
www.oracle.com
위의 링크에 들어가서 Oracle Database 21c (21.3) for Linux x86-64 를 다운로드 받아 줍니다.
2. 사용자와 그룹을 만들어 줍니다.
[root@localhost ~]# groupadd -g 54321 oinstall
[root@localhost ~]# groupadd -g 54322 dba
[root@localhost ~]# groupadd -g 54323 oper
[root@localhost ~]# useradd -u 54321 -g oinstall -G dba,oper oracle21c
[root@localhost ~]# passwd oracle21c
여기서 새로 만든 그룹들은 다음과 같습니다.
oinstall(Oracle Inventory Group) : Oracle 소프트웨어 설치 시의 기본 그룹으로 설치된 소프트웨어의 인벤토리 정보를 관리합니다.
dba(Database Administrator Group) : 데이터베이스 관리자 권한을 가진 사용자를 그룹화한 것입니다.
oper(Operator Group) : 데이터베이스 운영을 위한 추가적인 권한을 제공합니다. 데이터베이스를 운영하는데 필요한 권한을 가진 사용자를 그룹화 합니다.
oracle21c : oracle21c 사용자는 소유자로서, 데이터베이스 서비스를 운영하는데 사용합니다. 이 사용자는 oinstall 그룹의 일부이며, dba 및 oper 그룹에도 속해 있어 데이터베이스를 설치하고 운영하는데 필요한 권한을 가지고 있습니다. 따라서 이 사용자가 소유하는 디렉토리에는 데이터베이스 소프트웨어가 설치됩니다.
3. 이제 리소스를 충분히 할당하기 위한 설정을 해보겠습니다.
[root@localhost ~]# vi /etc/security/limits.conf
맨 아래줄의 다음에 대한 내용을 추가하고 저장합니다.
oracle   soft   nofile    1024
oracle   hard   nofile    65536
oracle   soft   nproc    16384
oracle   hard   nproc    16384
oracle   soft   stack    10240
oracle   hard   stack    32868
oracle   hard   memlock    134217728
oracle   soft   memlock    134217728
4. 다음은 오라클 설치를 위해 커널 파라미터 값을 설정하고, 시스템이 부팅될 때마다 자동으로 적용하게 해봅시다.
[root@localhost ~]# vi /etc/sysctl.conf
맨 아래에 다음에 대한 내용을 추가하고 저장합니다.
fs.file-max = 6815744
kernel.sem = 250 32000 100 128
kernel.shmmni = 4096
kernel.shmall = 1073741824
kernel.shmmax = 4398046511104
kernel.panic_on_oops = 1
net.core.rmem_default = 262144
net.core.rmem_max = 4194304
net.core.wmem_default = 262144
net.core.wmem_max = 1048576
net.ipv4.conf.all.rp_filter = 2
net.ipv4.conf.default.rp_filter = 2
fs.aio-max-nr = 1048576
net.ipv4.ip_local_port_range = 9000 65500
추가 및 저장한 후 자동으로 적용해 주려면 밑에 내용을 입력해 주세요.
[root@localhost ~]# sysctl -p
5. 오라클을 설치할 홈 디렉토리를 생성하고 사용자에게 소유권을 부여합니다.
[root@localhost ~]# mkdir -p /u01/app/oracle/product/21.0.0.0/
[root@localhost ~]# chown -R oracle21c:oinstall /u01/
[root@localhost ~]# chmod -R 775 /u01/
6. 자 이제 Oracle21c 설치를 위해 사전패키지 설치 작업을 수행해 봅시다.
[root@localhost ~]# yum -y install sysstat-11.7.3-11.el8.x86_64
[root@localhost ~]# yum -y install ksh-20120801-259.el8.x86_64
[root@localhost ~]# yum -y install glibc
[root@localhost ~]# yum -y install make-1:4.2.1-11.el8.x86_64
7. 네트워크를 통한 문제가 발생하지 않게 하기위해 방화벽 서비스를 중지하고 비활성화 합니다.
[root@localhost ~]# systemctl stop firewalld
[root@localhost ~]# systemctl disable firewalld
8. 이제 생성한 oracle21c 사용자로 로그인하여 환경 변수를 설정해 보겠습니다.
[root@localhost ~]# su - oracle21c[oracle21c@localhost ~]$ vi ~/.bash_profile
맨 밑줄에 다음에 대한 내용을 추가하고 저장해주세요.
# Oracle Settings
PATH=$PATH:$HOME/.local/bin:$HOME/bin

export PATH

export ORACLE_BASE=/u01/app/oracle
export ORACLE_HOME=$ORACLE_BASE/product/21.0.0.0
export ORACLE_SID=CNT
export PATH=/usr/sbin:$PATH
export PATH=$ORACLE_HOME/bin:$PATH
export LD_LIBRARY_PATH=$ORACLE_HOME/lib:/lib:/usr/lib
export CLASSPATH=$ORACLE_HOME/jlib:$ORACLE_HOME/rdbms/jlib
저장이 정상적으로 완료되었는지 확인해 봐야겠죠.
[oracel21c@localhost ~]$ cat ~/.bash_profile
# .bash_profile

# Get the aliases and functions
if [ -f ~/.bashrc ]; then
        . ~/.bashrc
fi

# User specific environment and startup programs

# Oracle Settings
PATH=$PATH:$HOME/.local/bin:$HOME/bin

export PATH

export ORACLE_BASE=/u01/app/oracle
export ORACLE_HOME=$ORACLE_BASE/product/21.0.0.0
export ORACLE_SID=CNT
export PATH=/usr/sbin:$PATH
export PATH=$ORACLE_HOME/bin:$PATH
export LD_LIBRARY_PATH=$ORACLE_HOME/lib:/lib:/usr/lib
export CLASSPATH=$ORACLE_HOME/jlib:$ORACLE_HOME/rdbms/jlib
잘 저장되었네요.
9. 이제 1번에서 다운받은 LINUX.X64_213000_db_home을 MobaXterm을 이용하여 옮겨주세요.
옮겨준 뒤 리스트를 확인해 봅시다.
[root@localhost ~]# ls -lst3036356 -rw-r--r--. 1 root root 3109225519 1월 2 16:38 LINUX.X64_213000_db_home.zip
0 drwxr-xr-x. 2 root root 6 1월 2 16:24 공개
0 drwxr-xr-x. 2 root root 6 1월 2 16:24 다운로드
0 drwxr-xr-x. 2 root root 6 1월 2 16:24 문서
0 drwxr-xr-x. 2 root root 6 1월 2 16:24 바탕화면
0 drwxr-xr-x. 2 root root 6 1월 2 16:24 비디오
0 drwxr-xr-x. 2 root root 6 1월 2 16:24 사진
0 drwxr-xr-x. 2 root root 6 1월 2 16:24 서식
0 drwxr-xr-x. 2 root root 6 1월 2 16:24 음악
4 -rw-r--r--. 1 root root 1312 1월 2 16:22 initial-setup-ks.cfg
4 -rw-------. 1 root root 974 1월 2 16:11 anaconda-ks.cfg
이제 오라클 설치를 위해 생성한 경로에 복사해 줍니다.
[root@localhost ~]# cp LINUX.X64_213000_db_home.zip /u01/app/oracle/product/21.0.0.0/
MobaXterm에 탭을 하나 더 열고 oracle21c 사용자로 로그인 해줍니다.
잘 복사되었는지 복사해 준 경로로 가봅시다.
[oracle21c@localhost ~]$ cd /u01/app/oracle/product/21.0.0.0/
[oracle21c@localhost 21.0.0.0]$ ls -lst
합계 3036356
3036356 -rw-r--r--. 1 oracle21c oinstall 3109225519  1월  2 16:48 LINUX.X64_213000_db_home.zip
그런데 압축파일의 권한에 대한 퍼미션이 생각한 것과 다르군요. root 사용자로 다시 돌아가서 권한을 다시 주겠습니다.
[root@localhost ~]# chown -R oracle21c:oinstall /u01
[root@localhost ~]# chmod -R 775 /u01
권한을 주었으니 다시 oracle21c 사용자로 돌아가 변경 되었는지 확인 해보겠습니다.
[oracle21c@localhost 21.0.0.0]$ ls -lst
합계 3036356
3036356 -rwxrwxr-x. 1 oracle21c oinstall 3109225519  1월  2 16:56 LINUX.X64_213000_db_home.zip
정상적으로 반영이 되었네요.
10. 이제 압축을 풀어봅시다.
[oracle21c@localhost 21.0.0.0]$ unzip LINUX.X64_213000_db_home.zip
정상적으로 압축이 풀렸다면 이런 형태로 나오게 됩니다.
[oracle21c@localhost 21.0.0.0]$ ls -lst
합계 3036444
3036356 -rwxrwxr-x.  1 oracle21c oinstall 3109225519  1월  2 16:56 LINUX.X64_213000_db_home.zip
      4 drwxrwxr-x. 11 oracle21c oinstall       4096  1월  2 17:49 install
      0 drwxrwxr-x.  4 oracle21c oinstall         30  1월  2 17:33 cfgtoollogs
     12 drwxrwxr-x.  2 oracle21c oinstall       8192  1월  2 17:33 bin
      0 drwxrwxr-x.  4 oracle21c oinstall         87  1월  2 17:33 clone
      0 drwxrwxr-x.  5 oracle21c oinstall        173  1월  2 17:33 deinstall
      0 drwxrwxr-x.  2 oracle21c oinstall        102  1월  2 17:33 addnode
      4 drwxrwxr-x.  8 oracle21c oinstall       4096  1월  2 17:33 oui
      4 drwxrwxr-x. 13 oracle21c oinstall       4096  1월  2 17:33 inventory
      4 -rwxrwxr-x.  1 oracle21c oinstall        507  1월  2 17:33 root.sh
     16 drwxrwxr-x.  4 oracle21c oinstall      12288  1월  2 17:33 lib
      0 drwxrwxr-x.  6 oracle21c oinstall         53  1월  2 17:32 sqlplus
      4 -rwxrwxr-x.  1 oracle21c oinstall         56  1월  2 17:31 oraInst.loc
      0 drwxrwxr-x.  9 oracle21c oinstall         93  7월 28  2021 assistants
      0 drwxrwxr-x.  7 oracle21c oinstall         69  7월 28  2021 crs
      0 drwxrwxr-x.  8 oracle21c oinstall         82  7월 28  2021 javavm
      4 drwxrwxr-x.  7 oracle21c oinstall       4096  7월 28  2021 jdk
      4 drwxrwxr-x. 13 oracle21c oinstall       4096  7월 28  2021 OPatch
      0 drwxrwxr-x.  5 oracle21c oinstall         41  7월 28  2021 hs
      0 drwxrwxr-x. 10 oracle21c oinstall        106  7월 28  2021 network
      0 drwxrwxr-x. 13 oracle21c oinstall        140  7월 28  2021 rdbms
      4 -rwxrwxr-x.  1 oracle21c oinstall        695  7월 28  2021 root.sh.old
      0 drwxrwxr-x. 11 oracle21c oinstall        119  7월 28  2021 ctx
      0 drwxrwxr-x.  3 oracle21c oinstall         20  7월 28  2021 demo
      8 drwxrwxr-x.  2 oracle21c oinstall       4096  7월 28  2021 jlib
      0 drwxrwxr-x.  8 oracle21c oinstall        101  7월 28  2021 odbc
      0 drwxrwxr-x.  5 oracle21c oinstall        119  7월 28  2021 sdk
      0 drwxrwxr-x.  2 oracle21c oinstall         23  7월 28  2021 ords
      0 drwxrwxr-x.  2 oracle21c oinstall         26  7월 28  2021 QOpatch
      0 drwxrwxr-x.  2 oracle21c oinstall         29  7월 28  2021 instantclient
      0 drwxrwxr-x.  2 oracle21c oinstall         33  7월 28  2021 utl
      0 drwxrwxr-x.  6 oracle21c oinstall         78  7월 28  2021 plsql
      4 drwxrwxr-x.  3 oracle21c oinstall       4096  7월 28  2021 sqlpatch
      0 drwxrwxr-x.  2 oracle21c oinstall         22  7월 28  2021 dbs
      0 drwxrwxr-x.  5 oracle21c oinstall         52  7월 28  2021 R
      0 drwxrwxr-x.  3 oracle21c oinstall         18  7월 28  2021 css
      0 drwxrwxr-x.  7 oracle21c oinstall         71  7월 28  2021 cv
      0 drwxrwxr-x.  3 oracle21c oinstall         20  7월 28  2021 data
      0 drwxrwxr-x.  3 oracle21c oinstall         20  7월 28  2021 diagnostics
      0 drwxrwxr-x.  3 oracle21c oinstall         19  7월 28  2021 dv
      0 drwxrwxr-x.  4 oracle21c oinstall         32  7월 28  2021 has
      0 drwxrwxr-x.  3 oracle21c oinstall         17  7월 28  2021 jdbc
      0 drwxrwxr-x. 10 oracle21c oinstall        112  7월 28  2021 ldap
      0 drwxrwxr-x.  8 oracle21c oinstall         76  7월 28  2021 md
      0 drwxrwxr-x.  4 oracle21c oinstall         31  7월 28  2021 mgw
      0 drwxrwxr-x.  5 oracle21c oinstall         46  7월 28  2021 nls
      0 drwxrwxr-x.  5 oracle21c oinstall         42  7월 28  2021 olap
      0 drwxrwxr-x.  4 oracle21c oinstall         35  7월 28  2021 oml4py
      0 drwxrwxr-x.  7 oracle21c oinstall         65  7월 28  2021 opmn
      0 drwxrwxr-x.  4 oracle21c oinstall         34  7월 28  2021 oracore
      0 drwxrwxr-x.  6 oracle21c oinstall         52  7월 28  2021 ord
      0 drwxrwxr-x.  3 oracle21c oinstall         19  7월 28  2021 oss
      0 drwxrwxr-x.  4 oracle21c oinstall         33  7월 28  2021 owm
      0 drwxrwxr-x.  5 oracle21c oinstall         39  7월 28  2021 perl
      0 drwxrwxr-x.  7 oracle21c oinstall         67  7월 28  2021 precomp
      0 drwxrwxr-x.  4 oracle21c oinstall         28  7월 28  2021 python
      0 drwxrwxr-x.  4 oracle21c oinstall         29  7월 28  2021 racg
      0 drwxrwxr-x.  3 oracle21c oinstall         21  7월 28  2021 relnotes
      4 -rwxrwxr-x.  1 oracle21c oinstall         10  7월 28  2021 root.sh.old.1
      0 drwxrwxr-x.  3 oracle21c oinstall         18  7월 28  2021 slax
      0 drwxrwxr-x.  4 oracle21c oinstall         41  7월 28  2021 sqldeveloper
      0 drwxrwxr-x.  3 oracle21c oinstall         17  7월 28  2021 sqlj
      0 drwxrwxr-x.  6 oracle21c oinstall         54  7월 28  2021 srvm
      0 drwxrwxr-x.  4 oracle21c oinstall         31  7월 28  2021 suptools
      0 drwxrwxr-x.  3 oracle21c oinstall         17  7월 28  2021 ucp
      0 drwxrwxr-x.  4 oracle21c oinstall         31  7월 28  2021 usm
      0 drwxrwxr-x.  7 oracle21c oinstall         69  7월 28  2021 xdk
      4 -rwxrwxr-x.  1 oracle21c oinstall       2927  7월 20  2020 schagent.conf
      4 -rwxrwxr-x.  1 oracle21c oinstall       1783  3월  9  2017 runInstaller
      4 -rwxrwxr-x.  1 oracle21c oinstall        852  8월 18  2015 env.ora
11. 이제 설치 마법사를 실행합니다.
[oracle21c@localhost 21.0.0.0]$ ./runInstaller
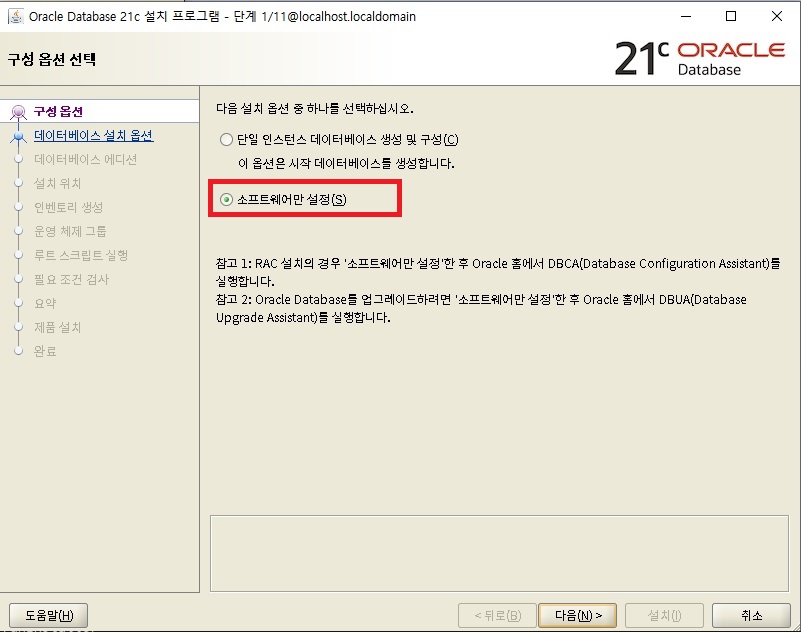
12. 소프트웨어만 설정 을 누른 후 다음으로 넘어가세요.
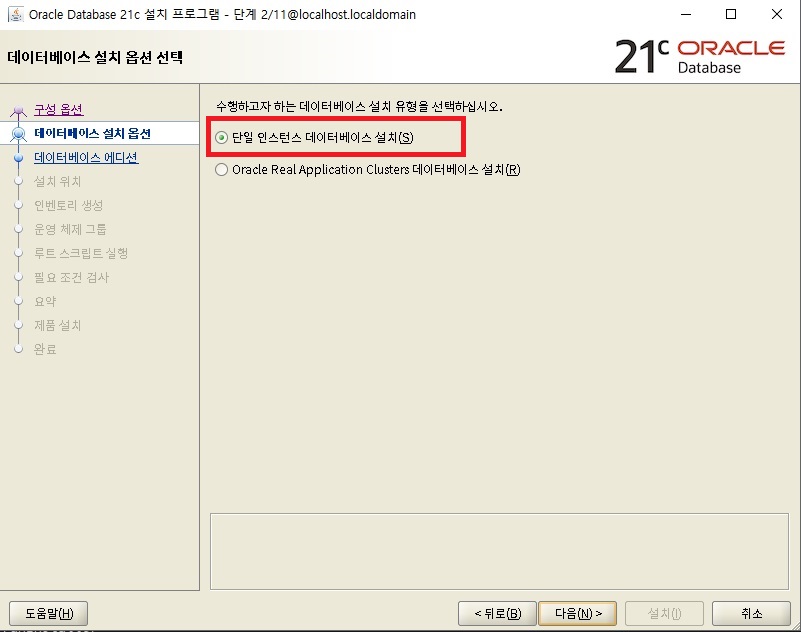
13. 단일 인스턴스 데이터베이스 설치 를 누른 후 다음으로 넘어가세요.
14. Enterprise Edition 을 누른 후 다음으로 넘어가세요.

15. Oracle 기본 위치 를 /u01/app/oracle로 설정하고 다음으로 넘어가세요.

16. 인벤토리 디렉토리 를 /u01/app/oraInventory 로 설정 후 다음으로 넘어가세요.
oraInventory 그룹 이름 은 oinstall로 변경해 주세요.

17. 데이터베이스 운영자(OSOPER)그룹(선택사항) 은 oinstall 로 설정 후 다음으로 넘어가세요.

18. 다음으로 넘어가세요.

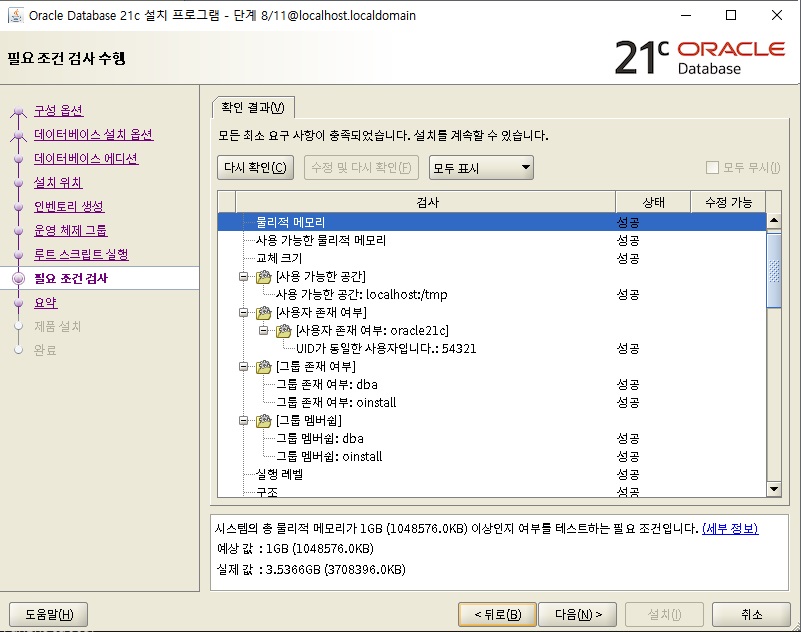
19. 필요 조건 검사를 확인하고 다음으로 넘어가세요.
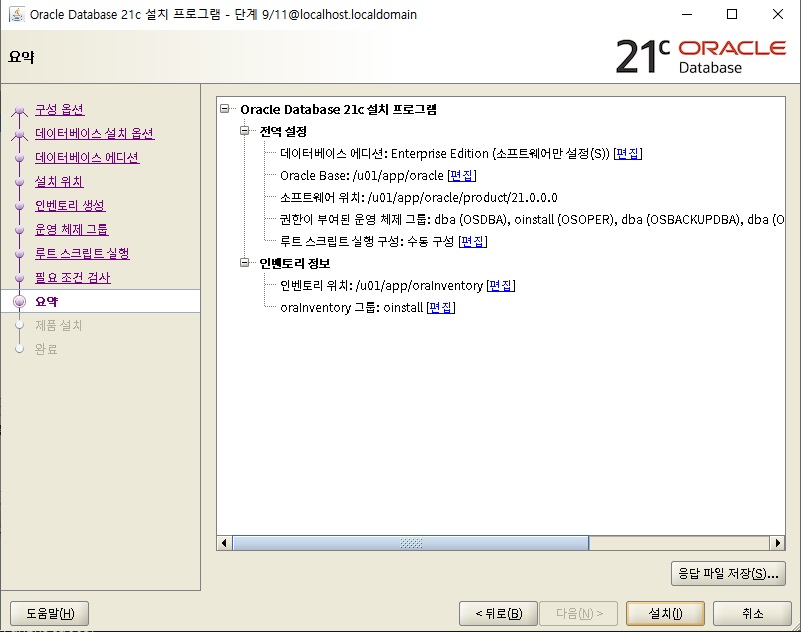
20. 요약을 확인 후 설치를 눌러주세요.
21. 설치가 정상적으로 진행 중입니다.

22. 설치 중간에 사진 캡처를 못하였는데, 구성 스크립트를 실행하세요 란 알림이 등장합니다.
설치 마법사를 종료하지 마시고, MobaXterm을 이용하여 root로 로그인 하여 아래 스크립트 명령을 실행해 주세요.
[root@localhost ~]# /oracle/app/oraInventory/orainstRoot.sh
Changing permissions of /u01/app/oraInventory.
Adding read,write permissions for group.
Removing read,write,execute permissions for world.

Changing groupname of /u01/app/oraInventory to dba.
The execution of the script is complete.
[root@localhost ~]#
[root@localhost ~]#
[root@localhost ~]# /u01/app/oracle/product/21.0.0.0/root.sh
Performing root user operation.

The following environment variables are set as:
    ORACLE_OWNER= oracle21c
    ORACLE_HOME=  /u01/app/oracle/product/21.0.0.0

Enter the full pathname of the local bin directory: [/usr/local/bin]: /usr/local/bin
23. 이제 설치가 완료 되었습니다.

24. 마지막으로 잘 설치되었는지 확인해 보겠습니다.
[oracle21c@localhost 21.0.0.0]$ sqlplus -v

SQL*Plus: Release 21.0.0.0.0 - Production
Version 21.3.0.0.0

[oracle21c@localhost 21.0.0.0]$
정상적으로 설치된 것을 확인할 수 있습니다.
이렇게 이번 포스트에는 Linux Red Hat 8.9 버전에 Oracle21c를 설치하는 방법에 대해 작성해 보았습니다.
감사합니다.
'Data > Database' 카테고리의 다른 글
| Redhat 8.8 IBM DB2 11.5.8 서버 설치 (root) (0) | 2023.12.14 |
|---|---|
| Redhat 8.8 IBM DB2 11.5.8 서버 사용자 설치 (non-root) (0) | 2023.12.13 |