
안녕하세요, 씨앤텍시스템즈 박선희 연구원입니다.

이번 게시물은 ASP.Net Core 3.1과 Nginx 연동을 하는 방법에 대해 설명하는 글입니다.
Nginx
Nginx는 차세대 웹서버라고 불리며, 웹서버 점유율이 압도적인 Apache의 독주에 제동을 걸고 있습니다.
Apache 오래전에 만들어진 소프트웨어이고, Nginx 는 새로운 시대의 요구사항에 맞게 개발된 소프트웨어입니다.
Nginx의 개발 목적은 높은 성능에 맞춰져 있으며, 과감히 사용하지 않는 기능은 삭제하기도 했습니다.
| 개발 환경 | |
| 개발 프레임워크 | Visual Studio Community 2019 / .NET Core 3.1 |
| 운영체제 | CentOS 7 |
| 소프트웨어 | Oracle VM VirtualBox / MobaXterm / nginx 1.18.0 |
ASP.Net Core를 이용해 개발한 프로젝트를 CentOS에 올린 후, Nginx를 통해 웹에 띄어주는 형태로 진행됩니다.
1. ASP.NET Core 앱 게시
2. Nginx 설치
3. .NET Core 설치
4. Nginx 와 ASP.NET Core 연동
1. ASP.NET Core 앱 게시
1) ASP.NET Core 앱 포트 설정
앱을 게시했을 때, 포트는 앱 내의 Program.cs 파일에서 변경할 수 있습니다.
필자는 로컬의 5000번 포트로 설정해두었습니다.
public static IHostBuilder CreateHostBuilder(string[] args) =>
            Host.CreateDefaultBuilder(args)
                .ConfigureWebHostDefaults(webBuilder =>
                {
                    webBuilder.UseStartup<Startup>().UseUrls("http://0.0.0.0:5000");
                });
2) ASP.NET Core 앱 게시
using Microsoft.AspNetCore.HttpOverrides;

services.Configure<ForwardedHeadersOptions>(options =>
{
      options.ForwardedHeaders =
      ForwardedHeaders.XForwardedFor | ForwardedHeaders.XForwardedProto;
});

app.UseForwardedHeaders();
앱 게시를 하기 위해서는 앱의 Startup.cs 부분에 이 내용을 추가해야 합니다.
역방향 프로식 서버를 사용하기 위해 설정해주는 것입니다.
자세한 내용은 공식 페이지에서 찾아볼 수 있습니다.
docs.microsoft.com/ko-kr/aspnet/core/host-and-deploy/linux-nginx?view=aspnetcore-5.0
Nginx를 사용하여 Linux에서 ASP.NET Core 호스트
Ubuntu 16.04에서 Nginx를 역방향 프록시로 설정하여 Kestrel에서 실행되는 ASP.NET Core 웹앱에 HTTP 트래픽을 전달하는 방법을 알아봅니다.
docs.microsoft.com
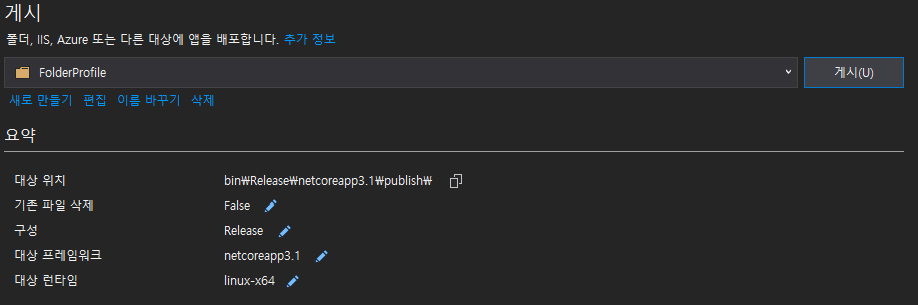
이 프로젝트는 폴더 형식 게시를 진행했습니다.
게시한 폴더를 Virtual Box를 이용해 구성한 CentOS 환경에 넣어줬습니다.
2. Nginx 설치
1) yum 외부 저장소 추가
yum 저장소에는 nginx 가 없어 외부 저장소를 추가해줘야 합니다.
vi /etc/yum.repos.d/nginx.reponginx.repo 내용은 다음과 같습니다.
[nginx]
name=nginx repo
baseurl=http://nginx.org/packages/centos/7/$basearch/
gpgcheck=0
enabled=1
2) yum Nginx 설치
yum을 통해 nginx를 설치합니다.
yum install -y nginx버전 확인을 합니다.
[root@localhost ~]# nginx -v
nginx version: nginx/1.18.0
3) Nginx 포트 설정
nginx 포트 및 네트워크 설정을 할 수 있습니다.
[root@localhost ~]# vi /etc/nginx/conf.d/default.conf
설정 파일을 열어보면 기본적으로 80 포트를 사용하는 것을 확인할 수 있습니다.
server {
    listen       80;
    server_name  localhost;

    #charset koi8-r;
    #access_log  /var/log/nginx/host.access.log  main;

    location / {
        root   /usr/share/nginx/html;
        index  index.html index.htm;
    }

    #error_page  404              /404.html;

    # redirect server error pages to the static page /50x.html
    #
    error_page   500 502 503 504  /50x.html;
    location = /50x.html {
        root   /usr/share/nginx/html;
    }

    # proxy the PHP scripts to Apache listening on 127.0.0.1:80
    #
    #location ~ \.php$ {
    #    proxy_pass   http://127.0.0.1;
    #}

    # pass the PHP scripts to FastCGI server listening on 127.0.0.1:9000
    #
    #location ~ \.php$ {
    #    root           html;
    #    fastcgi_pass   127.0.0.1:9000;
    #    fastcgi_index  index.php;
    #    fastcgi_param  SCRIPT_FILENAME  /scripts$fastcgi_script_name;
    #    include        fastcgi_params;
    #}

    # deny access to .htaccess files, if Apache's document root
    # concurs with nginx's one
    #
    #location ~ /\.ht {
    #    deny  all;
    #}
}
4) 방화벽 포트 개방
80/tcp 포트를 개방해줍니다.
[root@localhost ~]# firewall-cmd --permanent --zone=public --add-port=80/tcp
success
[root@localhost ~]# firewall-cmd --reload
success
[root@localhost ~]# firewall-cmd --list-ports
80/tcp
5) Nginx 실행
nginx 데몬을 실행해줍니다.
[root@localhost ~]# systemctl start nginxnginx 서비스의 상태를 보면 다음과 같이 실행되는 것을 확인할 수 있습니다.
[root@localhost ~]# systemctl status nginx
● nginx.service - nginx - high performance web server
   Loaded: loaded (/usr/lib/systemd/system/nginx.service; disabled; vendor preset: disabled)
   Active: active (running) since 화 2020-11-17 16:30:53 KST; 54s ago
     Docs: http://nginx.org/en/docs/
  Process: 9232 ExecStart=/usr/sbin/nginx -c /etc/nginx/nginx.conf (code=exited, status=0/SUCCESS)
 Main PID: 9233 (nginx)
   CGroup: /system.slice/nginx.service
           ├─9233 nginx: master process /usr/sbin/nginx -c /etc/nginx/nginx.conf
           └─9234 nginx: worker process

11월 17 16:30:53 localhost.localdomain systemd[1]: Starting nginx - high performance web server...
11월 17 16:30:53 localhost.localdomain systemd[1]: Can't open PID file /var/run/nginx.pid (yet?) after start: No such file or directory
11월 17 16:30:53 localhost.localdomain systemd[1]: Started nginx - high performance web server.
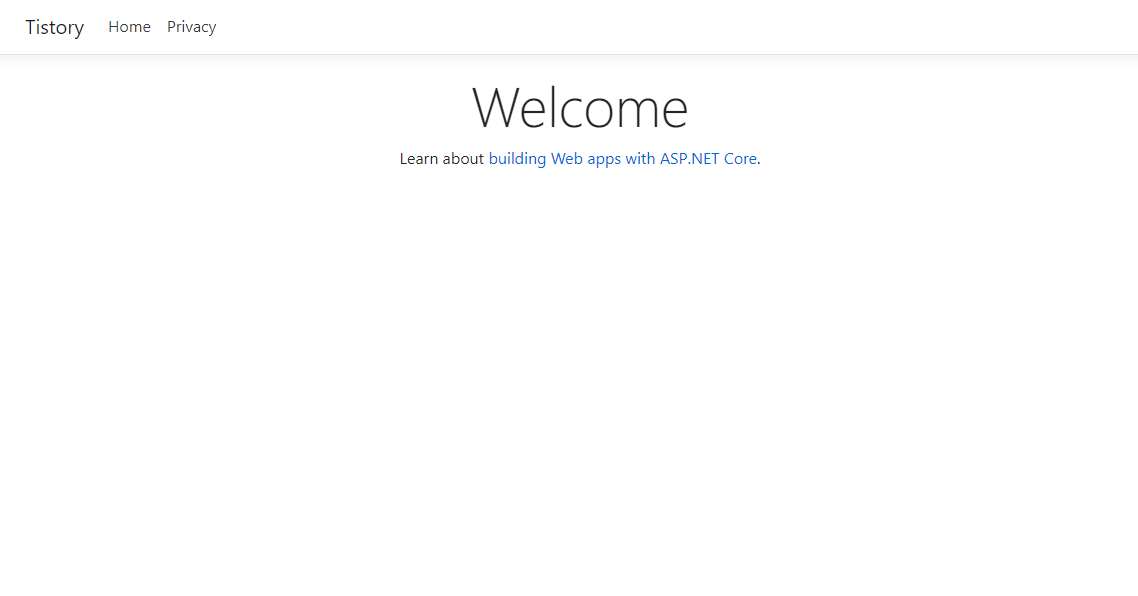
로컬 서버를 접속해보면 다음과 같이 홈페이지 나오는 것을 확인할 수 있습니다

3. .NET Core 설치
1) microsoft 패키지 저장소를 추가해줍니다.
rpm -Uvh https://packages.microsoft.com/config/centos/7/packages-microsoft-prod.rpm
2) .NET Core SDK를 설치합니다.
yum install dotnet-sdk-3.1
3) .NET Core SDK 버전을 확인합니다.
[root@localhost ~]# dotnet --version
3.1.404
4) 방화벽 포트 개방
[root@localhost Tistory]# firewall-cmd --permanent --zone=public --add-port=5000/tcp
success
[root@localhost Tistory]# firewall-cmd --reload
success
[root@localhost Tistory]# firewall-cmd --list-ports
80/tcp 5000/tcp
5) .NET Core 실행
게시한 해당 앱 폴더에 들어가서 dotnet을 실행합니다.
dll 파일이 실행 파일이라고 보시면 될 것 같습니다.
[root@localhost Tistory]# dotnet Tistory.dll
info: Microsoft.Hosting.Lifetime[0]
      Now listening on: http://localhost:5000
info: Microsoft.Hosting.Lifetime[0]
      Application started. Press Ctrl+C to shut down.
info: Microsoft.Hosting.Lifetime[0]
      Hosting environment: Production
info: Microsoft.Hosting.Lifetime[0]
      Content root path: /root/Tistory
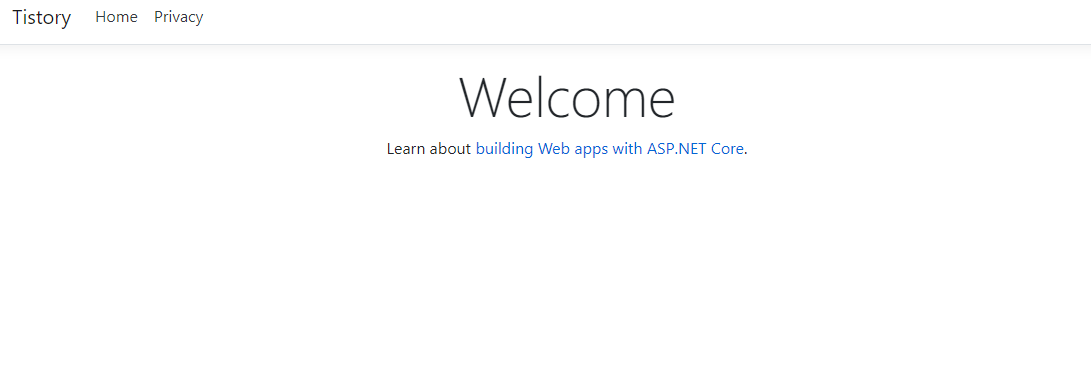
로컬에 들어갔을 시, 다음과 같은 화면이 뜨는 것을 확인할 수 있습니다.
4. Nginx와 ASP.Net Core 연동
1) 서비스 만들기
Nginx가 자동 실행되게 하기 위해서는 서비스를 만들어야 합니다.
[root@localhost Tistory]# vi /etc/systemd/system/kestrel-tistory.service

[Unit]
Description=Example .NET Web API App running on CentOS 7

[Service]
WorkingDirectory=/var/www/Tistory
ExecStart=/usr/bin/dotnet /var/www/Tistory/Tistory.dll
Restart=always
# Restart service after 10 seconds if the dotnet service crashes:
RestartSec=10
KillSignal=SIGINT
SyslogIdentifier=dotnet-example
User=apache
Environment=ASPNETCORE_ENVIRONMENT=Production

[Install]
WantedBy=multi-user.target
서비스 이름은 임의대로 지어주시고, 중요한 부분 몇 가지만 짚어보겠습니다.
WorkingDirectory=/var/www/Tistory -> ASP.NET Core 앱 폴더
ExecStart=/usr/bin/dotnet  -> dotnet 경로
/var/www/Tistory/Tistory.dll -> ASP.NET Core 앱의 dll 파일
Nginx와 .NET Core 가 잘 작동하는 것을 확인하였습니다.
그러면 이제 연동을 시작해보겠습니다.
2) Nginx 설정 파일 수정
Nginx의 설정 파일을 다음과 같이 변경해주세요.
[root@root ~]# vi /etc/nginx/conf.d/default.conf

server {
    listen       80;
    server_name  localhost;

    location / {
        proxy_pass         http://localhost:8080;
        proxy_http_version 1.1;
        proxy_set_header   Upgrade $http_upgrade;
        proxy_set_header   Connection keep-alive;
        proxy_set_header   Host $host;
        proxy_cache_bypass $http_upgrade;
        proxy_set_header   X-Forwarded-For $proxy_add_x_forwarded_for;
        proxy_set_header   X-Forwarded-Proto $scheme;
    }

    error_page   500 502 503 504  /50x.html;
    location = /50x.html {
        root   /usr/share/nginx/html;
    }
}
80 포트로 listen 하며 8080 포트로 proxy 해주었습니다.
공식 홈페이지를 참조했습니다.
docs.microsoft.com/ko-kr/aspnet/core/host-and-deploy/linux-nginx?view=aspnetcore-5.0
Nginx를 사용하여 Linux에서 ASP.NET Core 호스트
Ubuntu 16.04에서 Nginx를 역방향 프록시로 설정하여 Kestrel에서 실행되는 ASP.NET Core 웹앱에 HTTP 트래픽을 전달하는 방법을 알아봅니다.
docs.microsoft.com
3) 서비스 시작
[root@root ~]# systemctl start nginx
[root@root ~]# systemctl start kestrel-tistory.service
서비스를 시작했을 시, 포트를 넣지 않아도 asp.net core 앱과 연동되는 것을 확인할 수 있습니다.
지금까지 ASP.NET Core 프로젝트를 CentOS 7 환경에서
.NET Core 와 Nginx의 연동에 대해 알아보았습니다.
다음 게시물은 FHIR with ASP.NET Core 에 대해 알아보겠습니다.
감사합니다.
'Web Programming > ASP .Net Core 3' 카테고리의 다른 글
| [Asp.net core MVC] 쿠키와 세션을 이용한 로그인 구현 (2) | 2022.04.04 |
|---|---|
| SignalR (0) | 2021.03.16 |
| ASP .Net Core 3.1 Apache 연동 (0) | 2020.08.18 |
| ASP .Net Core 3.1 - MySQL 사용 (4) | 2020.06.03 |
| ASP .Net Core 3.1 - Razor (0) | 2020.04.23 |